
Garage doors do more than just provide a way in and out—they also play a big part in keeping your home energy-efficient. By acting as a barrier between the inside of your home and the outside weather, they help keep your home at a comfortable temperature and stop air from leaking in or out. A straightforward way to make your garage door even better at this is by adding weather stripping.
Weatherstripping is a flexible material that seals the gaps around the edges of the garage door. This seal helps keep out unwanted air, moisture, and even pests. Making weather stripping a regular part of your garage door repair routine is smart for improving your home’s energy efficiency.
It helps keep your home more comfortable by sealing out drafts and blocking moisture and pests. This small addition can lead to noticeable savings on your energy bills since your heating and cooling systems won’t have to work as hard. Easy to install and maintain, weather stripping is a simple yet effective upgrade that benefits your home and budget.
Why is Garage Door Weather Stripping Important for Energy Efficiency?
Garage doors can be a significant source of air leaks in a home, allowing warm or cool air to escape and outdoor air to infiltrate. This can lead to several issues:
Increased Energy Costs
When your garage door has air leaks, it forces your heating and cooling system to work much harder than it should. These leaks make it challenging for your HVAC system to keep your home at a comfortable temperature, which can significantly raise your energy bills. Over time, the extra energy used by your HVAC system due to these leaks can add up, leading to noticeably higher costs.
Reduced Comfort
If air leaks around your garage door, you might notice uncomfortable drafts in your home. These drafts make it challenging to keep your indoor spaces at a steady and comfortable temperature. As a result, some rooms may feel too cold in the winter or too warm in the summer, reducing the overall comfort of your home.
Potential Moisture Problems
Gaps around your garage door don’t just let in air—they can also let in moisture. This moisture can lead to severe problems like mold growth, wood rot, and other damage caused by excess water. Over time, these moisture issues can become costly to repair and may even affect the structural integrity of your garage.
Pest Infiltration
When gaps in your garage door seal exist, they can create an easy entry point for pests. Small creatures like insects, rodents, and even some small animals can squeeze through these gaps and enter your garage. Once inside, they can become a nuisance and might even cause damage to your belongings or the structure of your home.
Tools and Materials Needed for Installing Garage Door Weather Stripping
Before diving into the installation, take a moment to gather all the essential tools and materials you’ll need to ensure a smooth process:
- Tape measure
- Utility knife or scissors
- Cleaning supplies (such as a degreaser and a clean rag)
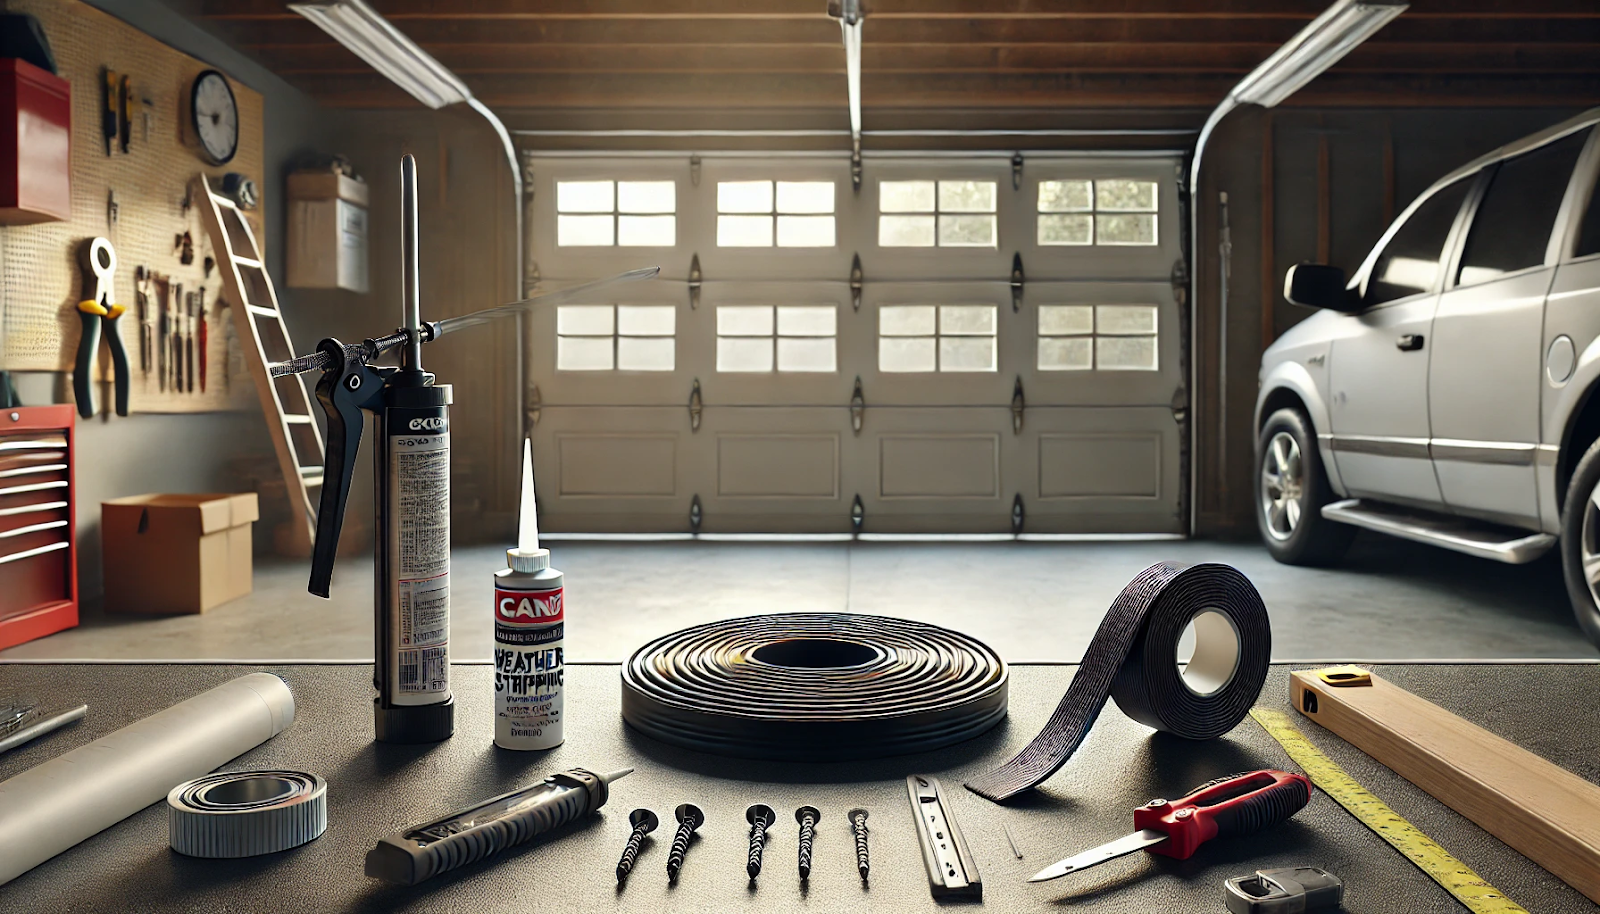
- Garage door weather stripping (the type and size will depend on your specific garage door)
- Adhesive or sealant (if required by the weather stripping manufacturer)
- Hammer or mallet (if using nails or staples to secure the weather stripping)
Step 1: Measure and Assess the Current Weather Stripping
Start by thoroughly inspecting your garage door’s weather stripping. Measure the length of the door’s bottom, sides, and top to determine how much new weather stripping you’ll need. As you check the weather stripping, look closely for any signs of damage, like cracks, dryness, or other wear and tear. These issues are important because they’ll help you decide whether to replace all the weather stripping or reinforce certain areas.
This careful assessment is key to ensuring your garage door has a tight seal. A tight seal boosts insulation, improves energy efficiency, and keeps your garage—and home—protected from the elements. Taking these steps will save you time and money in the long run.
Step 2: Remove the Old Weather Stripping
If the existing weather stripping on your garage door is in poor condition or needs to be replaced, start by carefully removing it. Use a utility knife or scissors to cut through the adhesive or sealant, holding the weather stripping in place. Take your time and work slowly to avoid damaging the door’s surface as you peel the old weather stripping away.
It’s important to be gentle during this process to ensure the door remains in good shape. Once the old weather stripping is completely removed, you can prepare the surface for the new weather stripping. This step is crucial to ensure that the new seal adheres appropriately and provides the best possible insulation for your garage door, helping maintain energy efficiency and protection from the elements.
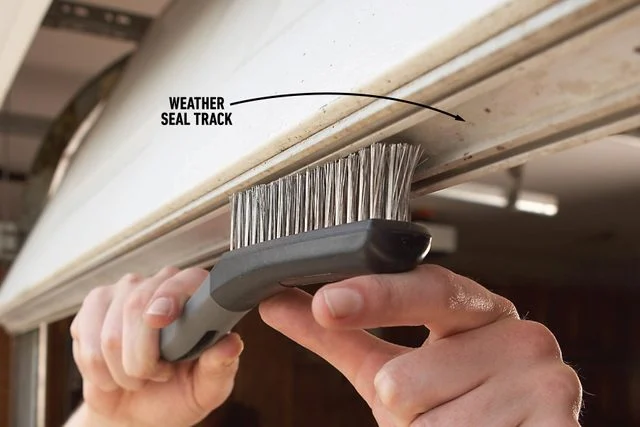
Step 3: Clean and Prepare the Garage Door for Installation
After removing the old weather stripping, it’s important to thoroughly clean the areas where the new weather stripping will be installed. Use a degreaser or another suitable cleaning solution to remove any dirt, debris, or residue that may have built up over time. This cleaning step is crucial because it ensures that the new weather stripping will have a clean surface to adhere to, helping to create a solid and long-lasting bond.
Taking the time to clean the door surface properly will also enhance the effectiveness of the new weather stripping, providing better insulation and protection. A clean surface ensures that the new seal will stick properly, helping to keep your garage well-insulated and shielded from the elements, ultimately boosting energy efficiency.
Step 4: Cut the New Weather Stripping to Size
Begin by measuring the lengths of the door’s bottom, sides, and top. Once you have the measurements, cut the new weather stripping to the appropriate sizes for each section. It’s a good idea to leave a small amount of extra length on each piece to account for slight variations in the door’s dimensions. This additional length ensures a snug fit, helping to create a tight seal that effectively blocks out drafts, moisture, and pests.
By cutting the weather stripping with some extra length, you can make any necessary adjustments during installation, ensuring the new weather stripping fits perfectly and provides maximum protection. This attention to detail helps maintain the integrity of your garage door, improving insulation and overall energy efficiency.
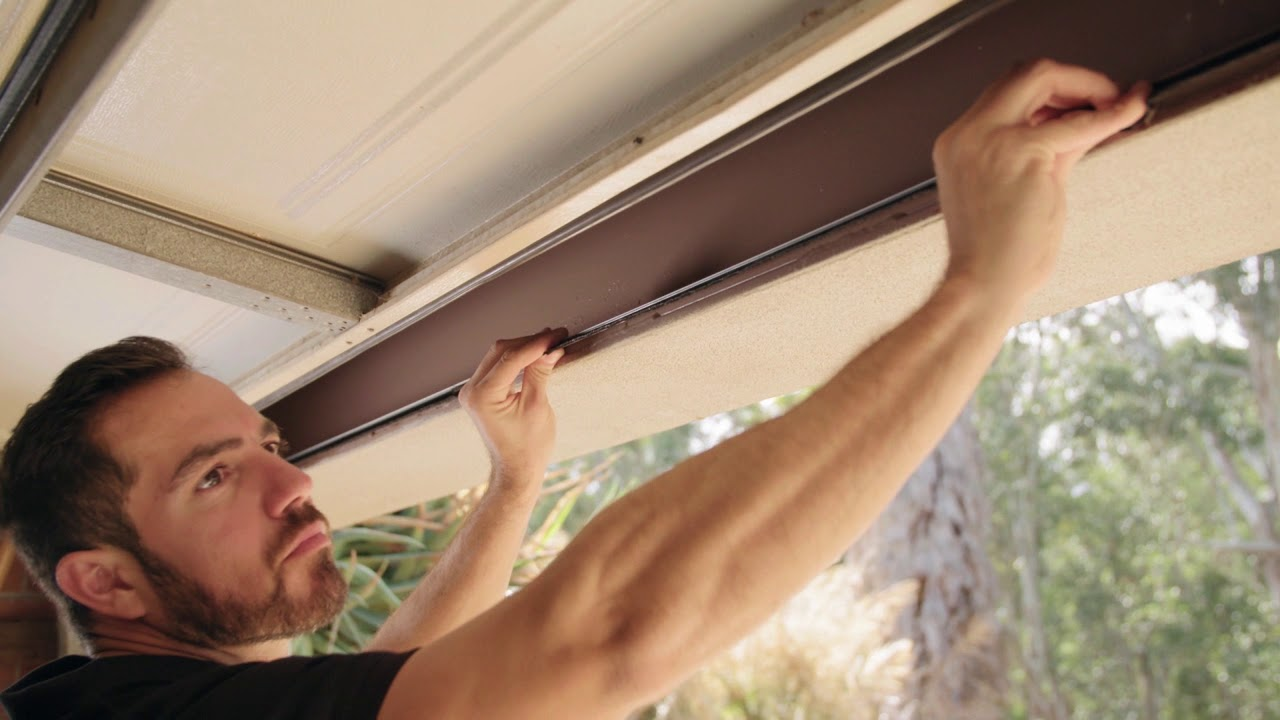
Step 5: Install the Weather Stripping on the Bottom of the Garage Door
Begin by installing the weather stripping on the bottom of the garage door. Peel off the backing on the adhesive side of the weather stripping and carefully press it into place, aligning it evenly along the door’s edge. Press down firmly to create a strong, secure bond.
If the weather stripping manufacturer recommends using additional fasteners, such as nails or staples, follow their instructions carefully. Avoid overtightening the fasteners, as this could cause the weather stripping to deform or become damaged.
Step 6: Install Weather Stripping on the Sides of the Garage Door
Next, install the weather stripping on the sides of the garage door. Start by lining up the weather, stripping evenly along each side, making sure it goes smoothly from top to bottom. Once it’s in place, press down firmly along the entire length to create a tight seal. This helps keep out drafts, moisture, and pests, which can help you avoid future garage door repair issues.
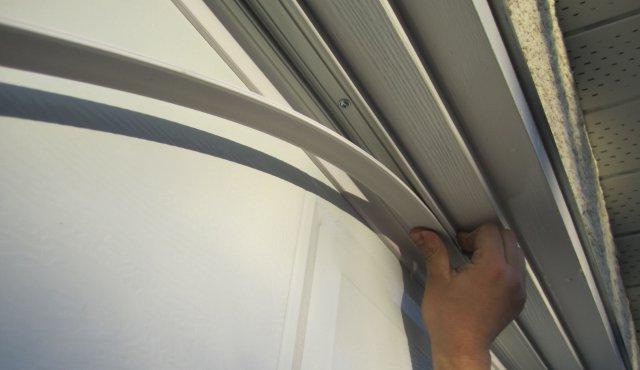
Doing this like you did with the bottom of the door will create a strong and effective barrier. Take your time to ensure the weather stripping sticks properly, which will help keep your garage better insulated and protected. This simple step can also reduce the chance of later needing expensive garage door repair services.
Step 7: Install Weather Stripping on the Top of the Garage Door
Finally, install the weather stripping along the top of the garage door. Like with the bottom and sides, follow the same installation process, carefully aligning the weather stripping to ensure a secure fit. Press firmly along the entire length to create a consistent seal that blocks drafts and moisture.
Taking your time during this step is essential for achieving a tight and even seal across the entire top of the door. A well-installed weather stripping will enhance your garage’s insulation, helping to maintain a comfortable temperature and protect your garage from the elements. This final step ensures that your garage door is sealed correctly, improving energy efficiency and protecting your space.
Step 8: Test the Garage Door for Proper Weather Stripping Installation
Once all the weather stripping has been installed, it is important to test the garage door’s operation. Open and close the door several times, paying close attention to how it moves and checking for gaps or air leaks around the edges. This step helps ensure that the new weather stripping works effectively.
If you notice any issues, such as gaps where air or light is coming through, take a moment to adjust the weather stripping. A proper, airtight seal is crucial for maintaining good insulation and protecting your garage from the elements. By carefully testing and adjusting as needed, you can ensure your garage door is well-sealed, contributing to a more energy-efficient and comfortable space.
Tips for Maintaining Garage Door Weather Stripping
To keep your garage door weather stripping in good condition and maximize its effectiveness, consider the following maintenance tips:
Inspect Regularly
Make it a habit to check the weather stripping around your garage door periodically. Look for signs it might be wearing out, such as cracking, drying out, or other visible damage. Addressing these issues as soon as you notice them can help maintain a good seal and keep your garage door working efficiently.
Clean the Weather Stripping
Over time, dirt, debris, and even moisture can build up on the weather stripping. To prevent this from compromising the seal, it’s a good idea to occasionally wipe it down with a clean, damp cloth. This simple step ensures that your weather stripping does its job effectively.
Lubricate the Weather Stripping
Apply a thin layer of silicone-based lubricant to keep your weather stripping in good condition. This helps keep the material flexible and reduces the risk of it wearing out prematurely. Regular lubrication is a quick and easy way to extend the life of your weather stripping.
Replace as Needed
If you notice that your weather stripping has become too worn out or damaged, it is important to replace it with new material. Doing so will help ensure that your garage door remains energy-efficient and performs at its best. Don’t wait too long to make this replacement, as worn-out weather stripping can lead to higher energy costs and other issues.
FAQs on How to Install Garage Door Weather Stripping
What is the weather stripping around a garage door called?
The weather stripping around your garage door is called a weather seal. It’s a flexible material that runs along the edges of your garage door. This seal helps keep out drafts, dust, and little critters, making your garage a more comfortable and clean space.
How do I fill the gap between my garage door and floor?
To close the gap between your garage door and the floor, you can install a garage door weather seal at the bottom of the door. This is usually a rubber or vinyl strip that compresses when the door is closed, creating a tight seal. Doing this effectively keeps out cold air, water, and unwanted pests.
How do I keep my garage door from sticking to the weather stripping?
If your new garage door is sticking to the weather seal, applying a little silicone-based lubricant can help. This lubricant reduces friction between the door and the seal, allowing the door to move smoothly. It’s a simple fix that can make a big difference, especially during extreme weather conditions.
How do you weather strip between double doors?
You can use a weather stripping kit explicitly designed to strip between double doors. These kits usually include a flexible seal that you can easily apply along the edges where the doors meet. This helps block drafts and moisture, making your home more energy-efficient and comfortable.
How do you fix the gap between weather stripping and a door?
If you notice a gap between the weather seal and your door, you might need to adjust the seal or replace it entirely. Sometimes, the seal can shift or wear out, causing it to lose its effectiveness. Ensuring the seal is aligned correctly and securely attached will help keep out the elements and maintain a comfortable indoor environment.
Conclusion
Adding weather stripping to your garage door is a small task that can make a big difference in your home’s comfort and efficiency. It’s not just about keeping out drafts, moisture, and pests—it’s about maintaining the temperature inside your home, which can save you money on energy bills. At Trusty Garage Door Repair, we know how important these details are to your everyday life.
We’re more than just a garage door contractor. We’re here to ensure every part of your garage door works to keep your home safe and comfortable. Whether you’re installing weather stripping yourself or need help with a more complex garage door repair, our team is ready to assist. We take pride in ensuring your garage door is in top condition, giving you peace of mind.
Don’t let small issues turn into costly problems. Addressing them early can save time, money, and stress. Trusty Garage Door Repair is here to help with all your garage door needs, from weather stripping to complete repairs. Contact us today, and let’s work together to enhance your home’s comfort and efficiency, one garage door at a time.
End Note
If you’re dealing with a garage door issue, don’t wait—let the experts handle it! At Trusty Garage Door Repair, we understand how frustrating it can be when your garage door isn’t working correctly. That’s why we’re committed to providing reliable and prompt garage door repair services to quickly get things back on track. Whether a minor fix or a major repair, our experienced team is ready to assist you with top-notch service that meets your needs.
We invite you to visit our website at Trusty Garage Door Repair to learn more about the wide range of services we offer. If you’re curious about specific services, you can check out our detailed page here. We proudly serve the Weatherford area and beyond, ensuring our community’s garage doors are in top condition.
To get to know us better, visit our About Us page, where you can discover more about our commitment to quality service. Stay informed with our latest updates and tips by following our blog. Whenever you’re ready, feel free to contact us through our contact page or connect with us on Facebook for more updates. Trusty Garage Door Repair is here to keep your garage door running smoothly—reach out today!