
Wiring a garage door opener might seem challenging, but you can do it yourself with the proper steps. Whether setting up a new opener or fixing the one you have, ensuring the wiring is done right is essential. It helps your garage door opener work smoothly and keeps your garage safe. If you run into trouble, garage door repair might be needed to get things back on track.
Nowadays, garage door openers come with convenient features like remote controls, smartphone access, and even voice commands, making them easy to use and adding convenience to your daily life. However, no matter how advanced these features are, the wiring ensures everything functions properly. Even the best features won’t work as they should without proper wiring.
This guide will show you how to wire your garage door opener in simple, easy steps. You’ll learn what tools you need and how to connect everything safely. This guide is perfect for beginners or anyone who needs a quick reminder. And if you run into any problems, don’t hesitate to call a garage door repair professional to ensure everything is done right.
By following these steps, your garage door opener will work quickly. You can relax knowing your garage is secure and everything works as it should.
Wiring Requirements For Garage Door Openers
Before you start wiring your garage door opener, it’s essential to understand the basics. These systems usually run on low-voltage circuits, which are different from the high-voltage circuits that power the rest of your home. The essential wiring parts include the motor unit, the wall control station, and safety devices like photoelectric sensors or infrared beams.
These components ensure your garage door opener works smoothly and safely. If you’re unsure about anything during the setup, it’s a good idea to call a professional for garage door repair to ensure everything is done correctly. Proper wiring not only keeps your garage door opener running efficiently but also enhances the overall safety of your garage, helping you avoid costly repairs in the future.
Tools and Materials Needed for the Wiring Process
You must gather the appropriate tools and materials for a successful wiring installation. Here’s a checklist of essential items:
- Garage door opener kit (including the motor unit, wall control station, and safety devices)
- Low-voltage electrical cables (typically 2-conductor or 4-conductor cables)
- Wire strippers and cutters
- Screwdrivers (flat-head and Phillips-head)
- Drill and drill bits (for mounting the wall control station and running cables)
- Electrical tape
- Cable clamps or staples
- Ladder (if necessary)
- Safety glasses and gloves
Safety Precautions Before Starting the Wiring Process
Safety should always be the top priority when working with electrical systems. Before commencing the wiring process, it’s crucial to take the following safety precautions:
- Disconnect the power supply to the garage door opener system by turning off the circuit breaker or removing the fuse.
- Ensure the garage door is closed and disconnect the door from the opener mechanism (if applicable).
- Clear the work area of any clutter or obstructions to avoid tripping hazards.
- Wear appropriate personal protective equipment (PPE) such as safety glasses and gloves.
- Read and understand the manufacturer’s instructions and safety guidelines thoroughly.
Steps to Successfully Wire a Garage Door Opener
Now that you’ve understood the wiring requirements gathered the necessary tools and materials, and taken the appropriate safety precautions, it’s time to follow the step-by-step guide for wiring your garage door opener.
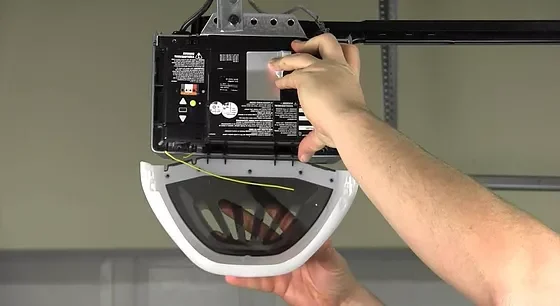
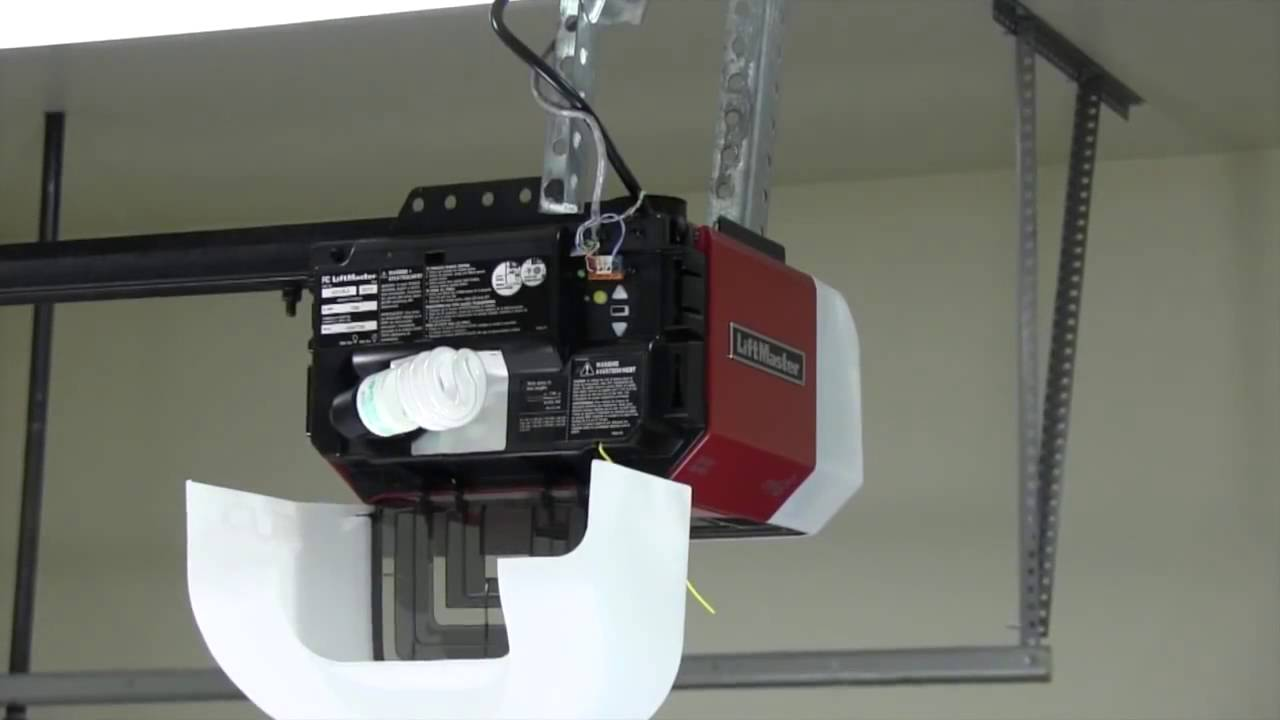
Step 1: Mount the motor unit
Begin by securely mounting the motor unit to the ceiling or wall, carefully following the manufacturer’s instructions for proper installation. It is crucial to choose a mounting location that provides adequate clearance for the garage door to open and close without obstructions.
Ensure the area is free from overhead obstacles, such as shelves or lights, that could interfere with the door’s movement. Properly securing the motor unit ensures reliable operation and helps prevent any potential damage to both the motor and the garage door system.
Step 2: Install the wall control station
Next, choose a convenient location for the wall control station, typically near the garage entrance, for optimal accessibility. This placement lets you operate the garage door without stepping inside, especially during bad weather.
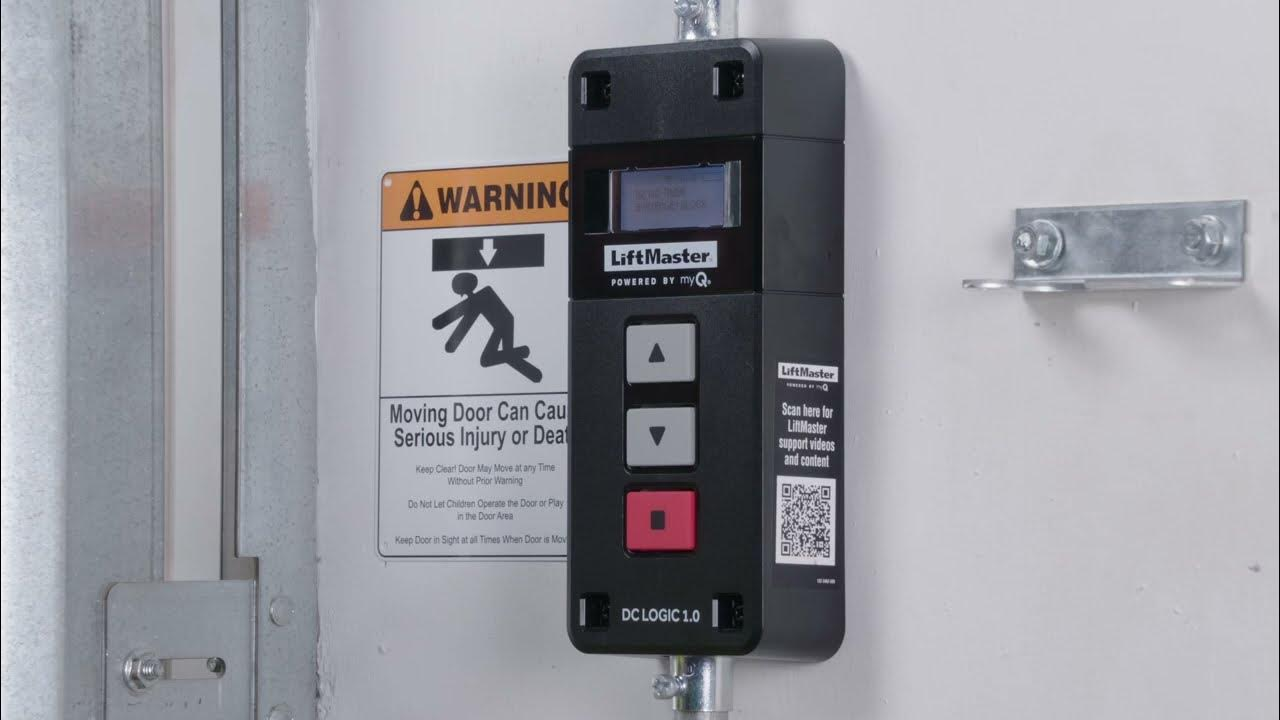
Use the provided mounting hardware to securely attach the station to the wall, ensuring it’s stable and at a comfortable height for all household members, including children. This thoughtful installation enhances convenience and safety, making your garage door opener more straightforward to use daily.
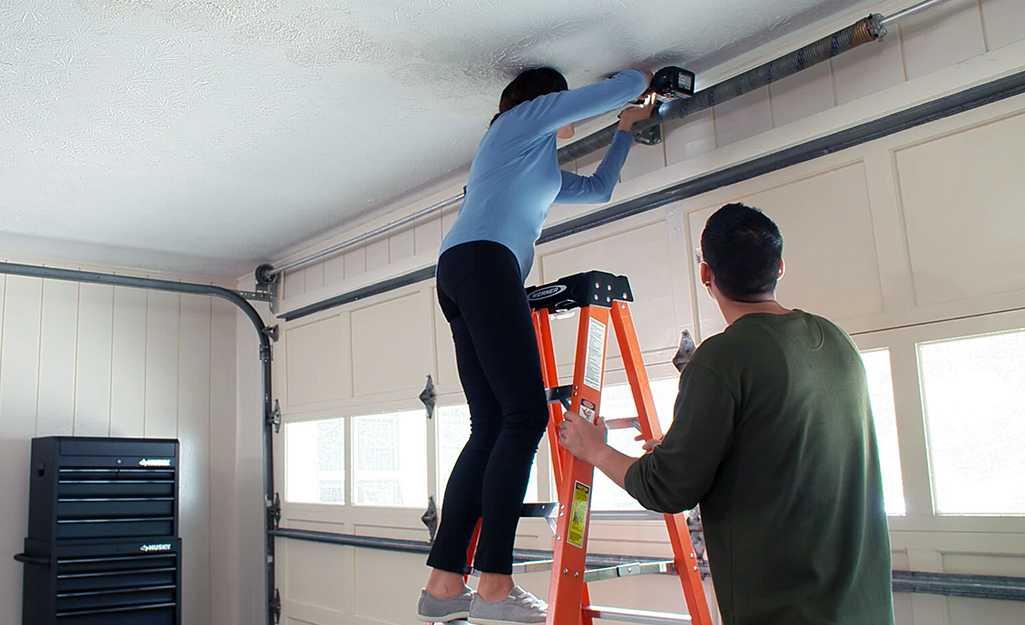
Step 3: Run the low-voltage cables
Connect the motor unit to the wall control station using low-voltage cables. Carefully follow the manufacturer’s wiring diagram and color-coding to ensure all connections are made correctly. This step is crucial in avoiding mistakes that could impact the performance of your garage door opener.
As you route the cables, secure them using cable clamps or staples. This will help prevent potential damage or interference, ensuring a safe, efficient, and reliable installation that operates smoothly.
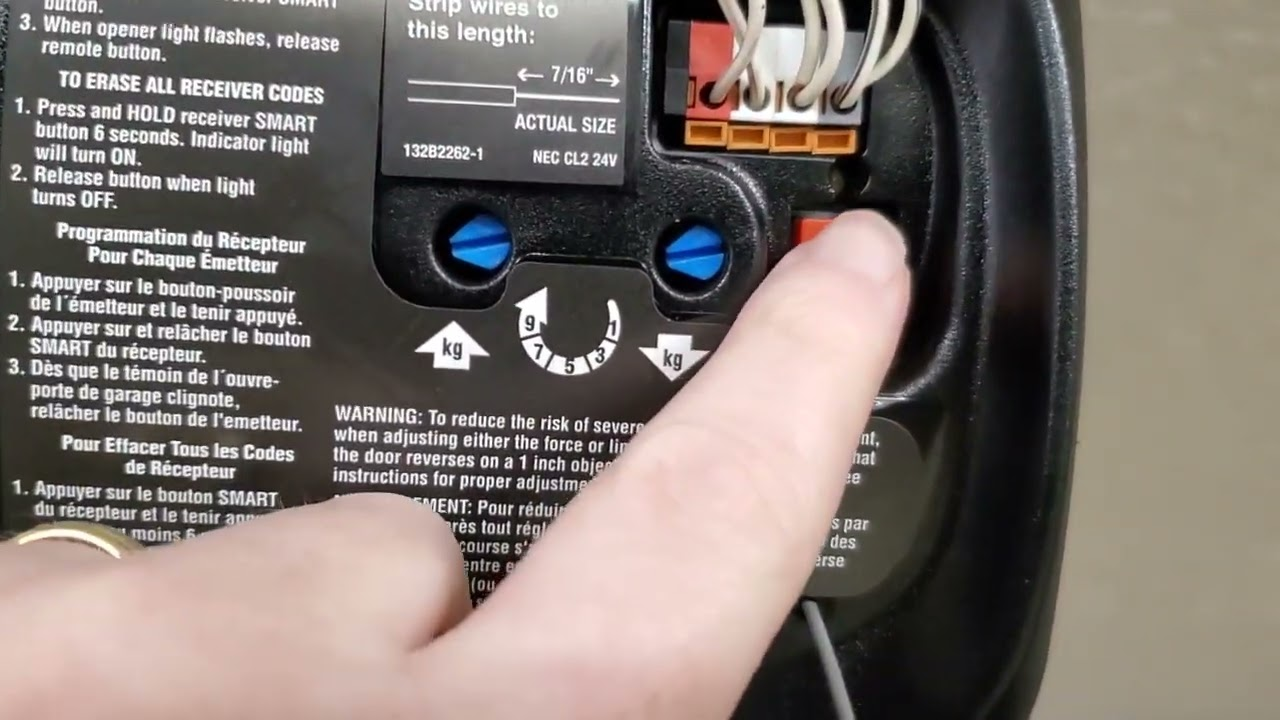
Step 4: Connect the safety devices
Most modern garage door openers, such as photoelectric sensors and infrared beams, have vital safety features. These advanced devices enhance your home’s safety by preventing the garage door from closing if an object or person is detected in its path. This feature is significant for families with children or pets.
To ensure these safety devices work correctly, carefully following the manufacturer’s instructions for wiring and positioning is essential. Doing so will give you peace of mind, knowing that your garage door opener operates safely and effectively.
Step 5: Connect power and test the system
Once all the wiring connections are made, it’s time to reconnect the power supply to the garage door opener system. Turn on the circuit breaker or replace the fuse, and then follow the manufacturer’s instructions to test the system’s operation.
Ensure that the door opens and closes smoothly and that all safety features function correctly. If you encounter any issues or errors, refer to the troubleshooting section of the manufacturer’s manual or seek professional assistance.
Testing the Wiring and Troubleshooting Common Issues
After completing the wiring process, it’s crucial to test the system thoroughly to ensure it functions correctly. Here are some steps to follow:
Visual Inspection
Look closely at the wiring connections and cable runs for loose or broken parts. Ensuring everything is tight and working well can prevent future issues. A good visual inspection is key to keeping your garage door in shape.
Safety Device Testing
Test the safety devices by placing an object in the garage door’s path. When you try to close the door, it should go back up or not close. This test ensures the safety features are working and keep everyone safe.
Remote Control Testing
Check the remote control by pressing the buttons to open and close the door from different distances. Ensure it works smoothly, allowing you to control the door without leaving your car. Testing the remote helps ensure you can easily manage your garage door when needed.
Wall Control Station Testing
Verify that the wall control station is working by using it to open and close the garage door. This step shows you have a reliable way to operate the door from the inside. A working wall control station adds convenience and safety to your garage door use.
If you encounter any issues during testing, here are some standard troubleshooting steps:
- Consult the manufacturer’s manual: The troubleshooting section guides resolving specific issues.
- Inspect the wiring connections: Verify that all connections are secure, properly terminated, and free from damage or corrosion. Ensure that the wires are tightly fastened and that there are no loose ends.
- Replace batteries: If using a remote control, try replacing the batteries to rule out any power-related issues.
- Reset the system: Some garage door openers have a reset button or procedure that can help resolve issues caused by software glitches or incorrect settings.
Top Features and Accessories for Your Garage Door Opener
While the core functionality of a garage door opener revolves around opening and closing the door, many modern systems offer additional features and accessories that can enhance convenience, security, and overall user experience. Here are some popular choices to consider:
Smartphone Integration
Some garage door openers can connect with smartphone apps, letting you monitor and control the door from anywhere. You can receive notifications and even set schedules for when you want the door to open or close. This feature adds convenience and peace of mind to your garage door operation.
Smart Home Integration
Many garage door openers work well with popular smart home platforms. These platforms allow you to control the door using your voice and connect it with other smart devices in your home. Smart home integration makes managing your garage door easier and more efficient.
Battery Backup
If there’s a power outage, a battery backup system ensures your garage door works. This prevents you from being locked out or stuck inside your garage. Having battery backup gives you extra security and reliability during unexpected situations.
Keypad Entry
For extra convenience and security, you can add a keypad entry system. This lets you open the garage door with a personalized code, so you don’t need a physical key or remote control. Keypad entry makes accessing your garage simple and secure.
Motion Sensors
You can add motion sensors to your garage door opener to enhance functionality. These sensors can automatically turn on lights or trigger other smart home actions when they detect movement in the garage. Motion sensors improve safety and convenience, making your garage a brighter space.
Tips for Keeping Your Garage Door Opener Running Smoothly
Regular maintenance is essential to ensure your garage door opener’s longevity and optimal performance. Here are some helpful tips to keep in mind:
Lubrication
Lubricate the moving parts of your garage door opener, such as the rail, pulleys, and hinges, regularly. This helps reduce friction and wear, allowing the door to operate smoothly. Proper lubrication is essential for keeping your garage door in good condition.
Battery Replacement
If your garage door opener has a backup battery or remote controls, replace the batteries as the manufacturer suggests. This helps prevent power loss or connectivity issues, ensuring your door works when needed. Regular battery replacement is an essential part of garage door maintenance.
Sensor Alignment
Check the alignment of the photoelectric sensors or infrared beams every so often. Make sure they are positioned correctly and working properly. Keeping the sensors aligned ensures that your garage door operates safely and effectively.
Debris Removal
Clear any debris or obstacles from the garage door tracks and the area around the opener. This prevents interference with the door’s movement, ensuring it opens and closes smoothly. Keeping the tracks clean is key to reliable garage door operation.
Professional Inspection
Consider booking a professional inspection and maintenance service at least once a year. This helps identify and fix potential problems before they become major issues. Regular inspections also keep your new garage door safe and functioning well.
Hiring a Professional vs. DIY Wiring
While wiring a garage door opener is a task many homeowners can undertake, it’s essential to consider the pros and cons of hiring a professional versus attempting a DIY installation.
Advantages of hiring a professional
- Expertise and experience: Professional installers have the knowledge and experience to handle the wiring and installation process efficiently and correctly, minimizing the risk of errors or safety hazards.
- Time-saving: Hiring a professional can save you significant time and effort, especially if you’re unfamiliar with the wiring process or face unexpected challenges during the installation.
- Warranty and liability: Professional installations often come with warranties and liability coverage, providing peace of mind in case of any issues or accidents.
- Code compliance: Professionals are familiar with local building codes and regulations, guaranteeing that your installation meets all requirements.
Advantages of DIY wiring
- Cost savings: Undertaking the wiring process yourself can result in substantial cost savings compared to hiring a professional.
- Sense of accomplishment: Completing a DIY project can provide a sense of pride, achievement, and valuable hands-on experience.
- Customization: DIY wiring allows you to customize the installation according to your needs and preferences.
- Convenience: You can work on the project at your own pace and schedule without coordinating with a professional’s availability.
Frequently Asked Questions on Wiring a Garage Door Opener
How to connect garage door opener wires?
To connect garage door opener wires, turn off the power to stay safe. You’ll see spots on the opener where the cables go, usually labeled for different jobs. Just match the wire colors to the right spots, often using the diagram in the manual. Tighten the screws to keep the wires in place, then turn the power back on and give it a test. It’s a pretty straightforward process if you follow these steps.
How many wires are there for garage door opener?
Most garage door openers need two or three wires. One or two wires go from the opener to the wall button, and another set connects to the safety sensors. Depending on the model, you’ll usually find that two wires are the standard for hooking up a garage door opener.
Do garage door openers have to be hard-wired?
Yes, garage door openers need to be hard-wired. This means they are directly connected to the power and control panel. Hardwiring ensures your garage door opener works reliably and safely, so it’s usually necessary.
What type of wire is used for garage doors?
The most common wire for garage doors is a 22-gauge, two-conductor bell wire. This type of wire is thin, bendable, and just right for the low-voltage needs of garage door openers and sensors.
How do you run wires in a garage?
To run wires in a garage, securing them along the ceiling or walls is best. You can use staples or clips to keep them in place. If you’re setting up wires for a garage door opener, ensure they’re out of the way of any moving parts and neatly secured. This keeps everything tidy and prevents damage to the wires.
Conclusion
Wiring a garage door opener might initially seem challenging, but it can be straightforward with the proper steps. This guide is here to help you get the job done quickly and safely, ensuring your garage door opener works just as it should. Whether installing a new opener or fixing the one you already have, getting the wiring right is crucial.
But if you have any issues or feel unsure, don’t hesitate to reach out. Trusty Garage Door Repair supports you with any garage door repair needs. As your go-to garage door contractor, we can ensure everything is wired correctly, and your door opener functions smoothly and safely.
If you ever need assistance, just give us a call. We’re ready to help with garage door problems so you can have peace of mind knowing your home is secure. Let us handle the hard work so you can enjoy the ease and convenience of a correctly wired garage door opener. Count on us to keep your garage door in excellent condition.
End Note
If your garage door is giving you trouble, it’s time to fix it before it becomes a bigger problem. Trusty Garage Door Repair is here to help with top-notch garage door repair services customized to fit your needs. Whether in Aubrey or elsewhere within our extensive service areas, our experienced and friendly team is ready to get your garage door running smoothly and securely again.
We understand how important a functioning garage door is for your home’s safety and convenience, so we’re committed to delivering fast, reliable service you can count on. If you’re curious about what we offer, look at our full range of garage door services here. If you are wondering if we cover your location, check out our service areas here.
For the latest tips, advice, and company updates, visit our blog. Stay connected on Facebook so you never miss special offers and news. To take the next step, contact us directly via our contact page or explore our homepage more. At Trusty Garage Door Repair, we’re dedicated to keeping your garage door in top condition—so you can focus on what matters!