How to Identify a Broken Garage Door Spring Before Disaster Strikes

How to Identify a Broken Garage Door Spring Before Disaster Strikes

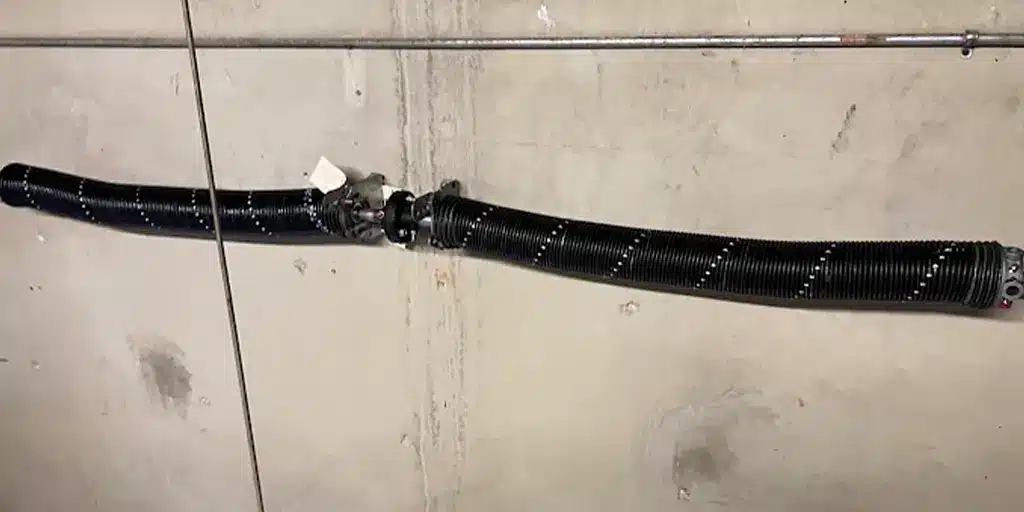
Your garage door spring is one of the most hardworking components in your home but also one of the most dangerous when it fails. These metal coils bear the full weight of your garage door, which can range from 300 to 500 pounds, every single time the door opens and closes. When a spring breaks, it’s not just an inconvenience; it can be a safety hazard. At Trusty Garage Door Repair Plano, we respond to emergency spring failures almost daily. The good news? Most catastrophic failures are preventable if you know what warning signs to watch for. This guide will help you identify a broken or failing garage door spring before disaster strikes. Understanding Your Garage Door Springs Before diving into the warning signs, it’s helpful to understand what you’re looking at. Most residential garage doors have one of two spring types: Torsion Springs: Located above the door opening, these springs twist to provide counterbalance. They’re typically the most durable but most dangerous when they fail. Extension Springs: Located on either side of the door, these springs stretch and contract. They’re slightly safer but still require professional handling. Both types wear out over time typically lasting 7-12 years with normal use. The lifespan depends on how often you use your door and local climate conditions. In North Texas, temperature fluctuations and humidity can accelerate wear. Warning Sign #1: The Door Feels Unusually Heavy One of the earliest indicators of spring failure is increased resistance when opening the door. Here’s what to watch for: The door requires significantly more effort to lift manually Your garage door opener struggles to open the door The opener motor runs longer than usual to complete a cycle The door moves slowly or hesitantly upward Springs are designed to counterbalance your door’s weight, making it easy to lift. When springs weaken, they lose this counterbalancing power, and the full weight falls on the opener system. If you notice this change, have a professional inspect your springs immediately. Warning Sign #2: Visible Rust or Corrosion Inspect your springs regularly you’ll find them mounted above the garage door opening or along the sides. Look for: Orange or brown rust spots on the spring surface Flaking or peeling paint Dark discoloration of the metal White or green corrosion (especially in humid climates) Rust is more than an appearance issue it weakens the metal structure of the spring. Corroded springs are more likely to snap suddenly under the strain of supporting your door’s weight. Texas humidity can accelerate rust formation, making regular inspection especially important for Plano homeowners. Warning Sign #3: Visible Cracks or Gaps in the Spring Coils A careful visual inspection might reveal physical damage: Small cracks or fractures in the coil Gaps between coils that shouldn’t be there Deformation or bending of the spring One spring looking noticeably different from the other If you notice any cracks, treat it as an emergency. A cracked spring is on the verge of complete failure and could break at any moment. Warning Sign #4: The Door Closes Too Quickly or Unevenly A properly functioning garage door descends at a controlled, steady pace. Warning signs include: The door closes faster than normal One side of the door drops faster than the other The door sags or leans to one side as it closes The door hits the ground with more force than usual This uneven movement indicates that one spring has failed or is significantly weaker than the other, creating a dangerous imbalance. Never attempt to use the door in this condition continued operation can damage the entire system and create safety hazards. Warning Sign #5: Loud Popping, Snapping, or Banging Noises Pay close attention to the sounds your garage door makes. Spring-related noises include: A sudden loud “pop” or “bang” from the garage Metallic cracking or snapping sounds Loud noise followed by the door becoming inoperable Squealing or screeching from the spring area A loud pop followed by immediate door failure is the telltale sign of complete spring breakage. If you hear these sounds, stop using the door immediately and contact a professional. The spring has likely failed or is about to. Warning Sign #6: The Door Won’t Stay Open at Mid-Height Test your door’s balance with this simple check: Manually lift your garage door halfway and release it. It should stay in place. If it doesn’t: The door slides down quickly after you release it The garage door opener can’t hold the door open The door feels like it’s fighting against you The door falls closed unexpectedly This indicates severe spring wear or failure. The springs are no longer providing adequate counterbalancing force. Warning Sign #7: Gaps Between Door and Frame Look at your closed garage door from the outside. You should notice: Increased gaps at the top of the door The door sitting lower than it used to Daylight showing around the top when the door should be sealed The door frame looking misaligned These gaps suggest the springs are no longer properly supporting the door’s weight, allowing it to sag. Warning Sign #8: The Garage Door Opener is Overworking Your garage door opener was designed to open the door smoothly not to support its full weight. When springs fail, the opener compensates, showing these signs: The motor runs continuously or for much longer than normal Clicking or grinding sounds from the opener The opener struggling to complete its cycle Higher than usual electricity usage Pushing a weakened system beyond its limits can permanently damage your expensive garage door opener, leading to costlier repairs. Warning Sign #9: Your Garage Door Is Getting Old Even without obvious signs of damage, springs have a predictable lifespan: Springs last approximately 7-12 years in normal conditions Heavy-use doors (multiple cycles daily) wear out faster Texas heat and humidity can shorten lifespan If you can’t remember the last service, it’s time for inspection Don’t wait for catastrophic failure. Schedule preventive maintenance if your springs are approaching the end of their expected life.

Heavy-Duty vs Standard Garage Door Springs: Which Is Right for Your Plano Home?

Heavy-Duty vs Standard Springs Which Is Right for Your Plano Home

When it’s time to replace your garage door springs, one key decision comes up: should you choose standard springs or upgrade to heavy-duty garage door springs? There’s no one-size-fits-all answer. The right spring depends on your garage door’s weight, daily use, and long-term reliability. Choosing correctly can prevent premature failures, reduce repair costs, and keep your garage door operating safely. At Trusty Garage Door Repair Plano, we help homeowners across Plano and North Texas make this choice every day. This guide explains the differences, costs, and benefits of each option so you can confidently select the best garage door spring for your home. Understanding Garage Door Spring Specifications: Cycle Rating The key difference between garage door spring types comes down to cycle ratings. One cycle equals one complete open-and-close of your garage door. Standard Garage Door Springs (10,000 Cycles) Typical lifespan: 7–10 years with normal useAverage daily use: 3–4 cycles (morning, evening, plus occasional extra use)Best for: Standard residential homes with single-car garages and moderate garage door use Heavy-Duty Garage Door Springs (15,000–20,000+ Cycles) Typical lifespan: 12–18 years with normal useAverage daily use: 5+ cycles (frequent access, multiple drivers, or light commercial use)Best for: High-traffic homes, multi-car garages, oversized doors, or commercial properties Think of it like tire ratings on a vehicle. A standard tire is designed for everyday driving, while a heavy-duty tire is built for tougher conditions and lasts significantly longer. Standard Garage Door Springs: The Common Choice Standard garage door springs are what most Plano homeowners have installed. They’re the default option because they provide reliable performance for typical residential garage door use. Advantages of Standard Garage Door Springs Lower Initial CostStandard springs typically cost $150–$300 per spring, making them the most budget-friendly choice for homeowners. Ideal for Normal UseIf your garage door is used 3–4 times per day, standard springs can perform reliably for many years. Readily AvailableMost garage door repair companies stock standard springs, allowing for quicker replacement when service is needed. Proven ReliabilityMillions of residential garage doors operate safely with standard springs. They’re a trusted, well-established option. Lower Installation CostStandard springs are generally easier to install, which can help reduce overall labor costs. Disadvantages of Standard Garage Door Springs Shorter LifespanWith normal use, standard garage door springs typically need replacement every 7–10 years, leading to recurring maintenance costs. Not Designed for Heavy UseIf your household operates the garage door more than 4–5 times per day, standard springs can wear out faster than their rated cycle life. Limited Flexibility for Changing NeedsIf your usage increases due to additional vehicles, family members, or a home-based business, standard springs may no longer be sufficient. Lower Overall DurabilityStandard springs are engineered for average stress levels. Under heavier demand, they are more prone to fatigue and failure. Heavy-Duty Garage Door Springs: The Premium Option Heavy-duty garage door springs are designed for long-term reliability and demanding use. They’re ideal for homeowners who want fewer breakdowns and less ongoing maintenance. Advantages of Heavy-Duty Garage Door Springs Extended LifespanRated for 15,000–20,000+ cycles, heavy-duty springs often last 12–18 years, significantly reducing replacement frequency. Better Long-Term ValueAlthough the upfront cost is higher, spreading the expense over 15+ years often results in a lower cost per year than replacing standard springs multiple times. Built for Heavier Garage DoorsOversized, insulated, or premium garage doors place more strain on springs. Heavy-duty springs provide stronger, more reliable support. Ideal for High-Use HomesHomes with multiple drivers, frequent garage access, or light commercial use benefit from the durability of heavy-duty springs. Improved SafetyWith added strength and higher tension ratings, heavy-duty springs are less likely to snap unexpectedly. Future-Proof PerformanceIf your usage increases over time, heavy-duty springs adapt without premature failure. Peace of MindFewer emergency repairs and more consistent performance mean less stress for homeowners. Disadvantages of Heavy-Duty Garage Door Springs Higher Initial CostHeavy-duty springs typically cost $250–$500 per spring, roughly double the price of standard springs. Unnecessary for Light UseIf your garage door is rarely used, the added durability may not provide enough value. Precision Installation RequiredHigher tension levels require expert installation, which can slightly increase labor costs. Cost Comparison: Standard vs Heavy-Duty Garage Door Springs 20-Year Cost Breakdown Standard SpringsYear 1: $400–$600Year 8–9: $400–$600Year 15–16: $400–$600Total: $1,200–$1,800 Heavy-Duty SpringsYear 1: $700–$1,200Year 18–19: $700–$1,200Total: $700–$2,400 (often just one replacement) In many cases, heavy-duty garage door springs cost less over time while delivering better reliability. Which Garage Door Springs Are Right for Your Plano Home? Choose Standard Garage Door Springs If: You use your garage door 3–4 times per day or less You have a single-car garage with a standard door Budget is the primary concern You plan to sell your home within 10 years You’re comfortable with periodic maintenance Your garage door opener is standard-duty rated Choose Heavy-Duty Garage Door Springs If: You use your garage door 5+ times daily You have multiple vehicles or a large garage door You plan to stay in your home 15+ years You want to minimize emergency repairs You run a home business or use the garage commercially Your door is oversized, insulated, or premium You value long-term reliability and safety You use a heavy-duty garage door opener You want fewer future service calls North Texas Considerations for Plano Homeowners Plano’s climate adds extra stress to garage door springs: Temperature FluctuationsSeasonal changes cause metal expansion and contraction. Heavy-duty springs handle this stress better. HumidityMoisture accelerates rust and corrosion. Heavy-duty springs often include better protective coatings. Extreme HeatHot summers weaken lower-grade springs faster. Dust and DebrisNorth Texas dust increases wear. Heavy-duty construction resists this damage more effectively. Because of these factors, heavy-duty springs are often the smarter choice for Plano homes. Our Professional Recommendation At Trusty Garage Door Repair Plano, we recommend based on facts, not upsells. For Most HomeownersHeavy-duty garage door springs provide the best long-term value and reliability. For Budget-Conscious SituationsStandard springs are available, with clear guidance on future replacement expectations. For Unique NeedsWe assess door size, usage, climate exposure, and how long you plan to stay in your home before making

How Much Does Garage Door Replacement Cost in 2025? Complete Guide

garage door replacement

Wondering how much a garage door replacement costs in 2025? Whether your door is dented, sagging, or just outdated, the total garage door replacement cost can vary greatly depending on several key factors. This homeowner’s guide breaks it all down-from average pricing to smart savings tips. Average Garage Door Replacement Cost in 2025 The average cost to replace a garage door in the U.S. ranges from $700 to $2,500+, depending on the material, door size, and level of customization. For premium upgrades or large, double garage doors, expect to spend more. If you’re replacing the opener or need structural modifications, your total garage door installation cost can increase by $300–$1,000 or more. 🔗 Looking for reliable installation? Explore our Garage door repair Plano TX service for fast, affordable help near you. 12 Key Factors That Influence Garage Door Replacement Cost Repair or Replace: Which One Saves More? If your door is relatively new and the issue is cosmetic or isolated (like a damaged spring or panel), repair might be the better option. However, if you notice: …it may be time for a full garage door replacement to avoid escalating repair costs. Professional vs. DIY Garage Door Replacement Installing a garage door involves high-tension springs, electrical components, and safety risks. While DIY might seem like a money-saver, hiring licensed pros ensures: Trusty Garage Door Repair offers same-day service, quality craftsmanship, and transparent pricing for all installations. How To Save on Garage Door Installation Costs FAQs About Garage Door Replacement How much does a new garage door cost on average? Anywhere from $700 to $2,500+, depending on size and features. Is it cheaper to repair or replace a garage door? Repairs are cheaper short-term. But replacement may be smarter if your door is older or has multiple issues. How much is a 2 car garage door replacement cost? Expect to pay $1,200–$2,500 or more depending on material and extras. How long does garage door installation take? A professional installation usually takes 3–6 hours. Will a new garage door increase home value? Yes! According to the latest Cost vs. Value Report, garage door replacement offers a 102.7% ROI. Final Thoughts Now that you know the real cost to replace a garage door, you’re better prepared to choose the right option for your budget and home. Ready to upgrade? Contact Trusty Garage Door Repair for trusted local service, top-tier parts, and unmatched expertise. Whether you’re in Plano, TX or nearby, our team is here to help you get the most value from your next installation. 📞 Call us at 214-624-6348 or Book Online to schedule your free quote today.

Single Garage Door Panel Replacement: Cost, Types & Safety Guide 2025

garage door panel replacement

A single dented, cracked, or rusted garage door panel doesn’t mean you need a brand-new door. Many homeowners don’t realize that replacing just one or two damaged panels costs a fraction of full door replacement and restores both function and curb appeal instantly. At Trusty Garage Door Repair, we help Plano homeowners save thousands by identifying when panel replacement makes sense versus when full replacement is necessary. This guide covers everything about garage door panel replacement: panel types, exact costs, how to identify compatible panels, and why professional installation matters for safety. Panel Replacement vs. Full Door Replacement: Quick Decision Guide Confused about whether to replace one panel or the whole door? Use this quick reference: Situation Best Solution Estimated Cost Single panel dent or crack Panel replacement $250–$800 2–3 damaged panels Evaluate structural integrity $500–$1,500 4+ damaged panels or frame damage Full door replacement $1,200–$2,500+ Door older than 15 years Full replacement recommended $1,200–$2,500+ Material/design discontinued Full replacement only option $1,200–$2,500+ Minor cosmetic issue on newer door Panel replacement $250–$800 Structural issues (sagging, misalignment) Professional inspection required Varies Pro tip: Even if one panel is damaged, always get a professional inspection. Sometimes what looks like panel damage is actually a frame, track, or spring issue that requires full replacement. Garage Door Panel Types & Replacement Costs Not all garage door panels are alike. Understanding your door type is essential for accurate pricing and compatibility. Sectional Door Panels (Most Common – 85% of homes) Sectional doors have 4–8 horizontal panels that slide up and down on tracks. Individual panels are highly replaceable. Steel sectional panels: Insulated steel sectional panels: Aluminum sectional panels: Wood or composite sectional panels: Insulated or custom sectional panels: Tilt-Up/Swing-Out Door Panels Older homes sometimes have single-panel tilt-up doors. These are one large panel that swings upward. Roll-Up/Coil Doors Commercial-style rolling doors use individual slats rather than panel sections. How to Identify Your Garage Door Panel Type Before getting a quote, identify your door: Check if your door is sectional: Find your brand and model: Measure your panel: Take photos: Why this matters: Panels are NOT universal. A Wayne-Dalton panel won’t fit a Clopay door. Matching size, thickness, and design is critical. Cost to Replace Garage Door Panels: Detailed Breakdown Here’s what you’ll actually pay for a professional panel replacement: Single Steel Panel Replacement (most common) Two Panel Replacement Insulated Panel Replacement Premium/Wood Panel Replacement Why Single Panel Replacement Sometimes Backfires: Important Warnings Before you replace just one panel, understand these potential issues: 1. Color/Finish Mismatch 2. Hidden Damage Discovery 3. Misalignment Issues 4. Spring and Hinge Wear 5. Discontinued Panels When to Replace One Panel vs. When to Replace the Entire Door Replace just the panel(s) if: Replace the entire door if: Get a professional inspection if: How Professional Panel Replacement Works Understanding the process helps you see why professional installation is safer and better: Step 1: Damage Assessment Step 2: Source Matching Panel Step 3: Tension Release (Critical Safety Step) Step 4: Panel Removal Step 5: New Panel Installation Step 6: System Testing Step 7: Cleanup & Warranty Can You Replace a Single Garage Door Panel Yourself? Short answer: Don’t do it. Why professional installation is essential: Cost comparison: The math is simple: hire a professional. Matching Your Old Panel: Color, Finish & Material Guide Getting a perfect match matters for curb appeal. Here’s how professionals match panels: Material Matching (Most Important) Color Matching Options Finish Options Pro Tip: If your door was painted custom colors years ago, full-door repainting is often cheaper than trying to match that old paint. Modern paint technology offers better durability anyway. Garage Door Panel Maintenance: Extend Your Panel Life Replacing panels now? Here’s how to prevent future damage: Frequently Asked Questions About Panel Replacement Can I replace just one garage door panel? Yes, if it’s a sectional door, the panel matches your model, and the rest of the door is in good condition. Tilt-up doors are more complex; sometimes full replacement is necessary. What’s the cost to replace a garage door panel? Typically $250–$800 total (panel + labor). Steel panels are cheapest ($250–$600); wood/composite run $450–$1,100+. Are garage door panels universal? No. Each brand (Wayne-Dalton, Clopay, Amarr) and model has specific panel dimensions, thickness, and attachment methods. Mixing brands doesn’t work. How long does panel replacement take? Professional installation typically takes 1–2 hours for a single panel; 2–3 hours for two panels. Should I replace one panel or the entire door? If the door is under 15 years old, only one panel is damaged, and parts are available—panel replacement saves money. If the door is old, damaged on multiple panels, or difficult to match, full replacement is often wiser long-term. What if I can’t find a matching panel? If panels are discontinued, you have three options: paint the entire door to hide mismatches, explore aftermarket/compatible panels, or replace the full door. Will my warranty cover panel replacement? Most manufacturers offer 10-year warranties on doors but exclude DIY damage. Professional installation warranties typically cover the panel and labor for 1–5 years depending on the company. Need Expert Panel Replacement Guidance? Not sure if one panel or a full door replacement is right for you? Trusty Garage Door Repair offers free in-home inspections in the Plano, TX area. We’ll: 📞 Call 214-624-6348 or Book Online to schedule your free inspection today.

How to Open a Garage Door Manually After a Power Outage

Open a Garage Door Manually After a Power Outage

It is quite upsetting to experience a power cut and have your car trapped in the garage. In these circumstances, knowing how to open garage door with no power is critical. You can face being locked outside of your own garage at any time, which could be extremely inconvenient. This guide outlines how to manually open garage door systems in case of a power failure. Even if you have no previous experience handling it in the past, we have simplified the instructions into a clear set of steps that, when followed, will guarantee safety and confidence. How to Open a Garage Door With No Power Step One: Verify the position of the Garage Door Before doing anything else manually, make sure that the garage door is shut completely. Step one is checking if the garage door is closed. For safety reasons, you should not disengage the opener if the door is open. If you find yourself unable to move the door, calling for professional help is the only option. Step 2: Find and Pull the Emergency Release Cord Look for the emergency release cord, which is usually a red T-shaped handle that hangs from the garage door opener rail. Pulling it down firmly will disengage the door from the opener, allowing you to operate it manually. Step 3: Lift the Garage Door Manually At this point, after pulling the emergency release cord, the door should be able to move freely and not be stuck. Begin lifting the door; if it lifts without any complications, then you are good to go. But if it’s too heavy to lift or seems locked, it is likely that there is a broken spring. Many people perceive the garage door opener to be the one who does all the heavy lifting, but in reality, the springs do all the work. The opener merely guides the door’s motion. If the springs are broken, then the door becomes overly heavy, making it difficult to lift manually. If you do suspect that there is a broken spring, do not attempt to lift it as it is unsafe and could result in making the situation worse. Instead, call a professional for help as they will be able to assist you in a safe and reliable manner. Step 4: Pull the Emergency Release Cord Toward the Door To restore electric operation, pull the emergency release cord towards the door to re-engage the carriage. This will compress the spring lever and allow the mechanism to align properly, such that the trolley and the carriage can reconnect correctly. Step 5: Re-connect the Trolley to the Opener Carriage Once the cord is pulled toward the door, the opener should be activated by running it through a complete cycle of opening and closing the garage door. While the trolley and carriage slide across each other, a loud click should be heard. That means the two parts are reconnected. This means that the garage door can now be opened and closed electronically like before. Safety Tips Don’t Force the Door: If the door cannot move easily, do not attempt to force it. This might signify a mechanical problem that needs to be looked at by a professional. Regular Maintenance: Make sure that the garage door system is kept in good condition. This maintenance prevents problems from arising during power outages. Know Your System: Understand the garage door’s manual release mechanism in advance so you can take the necessary steps without waiting for an emergency. When to Seek Emergency Services? If any of the situations mentioned below apply to you, make sure to contact a garage door professional right away: Broken Springs or Cables: These components are highly dangerous to manage since they are highly tense. Unusual Sounds or Movements: These might be signs of problems that are already present and require attention from a professional. For homeowners in Texas, our experts provide fast and reliable garage door repair Plano tx services. Whether it’s for emergency fixes or routine maintenance, we’re always just a call away. In Conclusion Knowing how to manually open a garage without power is key for safety reasons. Use the information presented above to help you understand that operations can continue even when there is no electricity. And should you begin to feel lost dealing with issues that are more complicated than what you are used to, do not wait and reach out for emergency garage door repairs. FAQs 1: How do I open my garage door with no power? If your power’s out and you’re stuck, don’t worry, it’s actually pretty simple to open a garage door with no power. Just locate the red emergency release cord hanging from the opener rail. Pull it down firmly to disconnect the door from the opener. Once it’s disengaged, you can manually lift the door. 2: Can I manually open my garage door safely? Yes, you can! Manually opening a garage door is safe as long as the door’s springs are in good condition. Pull the emergency release cord (usually red) and lift the door slowly. If it feels unusually heavy or stuck, don’t force it, there may be a bigger issue that needs professional help. 3: What’s the best way to open a garage door without power? The best way to open a garage door without power is to first make sure it’s in the closed position, then pull the emergency release cord. After that, you can lift the door manually. Just be careful, if the door is halfway open or misaligned, it could be risky to move on your own. 4: Why won’t my garage door open manually? If your garage door won’t open manually, the issue could be with the spring system or a jammed track. Even if you’ve pulled the emergency release, the door should move smoothly. If it doesn’t, it’s best to call in a technician before trying again. 5: Should I call a pro if I can’t open my garage door with no power? Absolutely. If you’ve

Belt Drive vs. Chain Drive Garage Door Opener: Which One Should You Choose?

Craftsman 1_2 HR Garage Door Motor

When you’re shopping for a new garage door opener, one question always comes up: Should you go with a belt or chain drive? It’s a valid question and one that confuses a lot of homeowners. Both options can lift your garage door, but they’re designed for different needs, budgets, and preferences. So… which is better: belt or chain garage door opener? Let’s break it down What’s the Difference Between a Chain Vs Belt Garage Door Opener? The main difference comes down to how the motor moves the trolley that lifts your garage door. Chain drive openers use a metal chain (like a bike chain) to do the heavy lifting. Belt drive openers use a rubber belt, reinforced with steel or fiberglass cords. Same purpose, different parts. Now let’s look into what that means for you. Belt vs Chain Garage Door Opener: The Key Differences 1. Noise Level Chain Drive: The chain drive makes a Loud and clunky noise, especially in older models. The metal-on-metal action makes noise. Belt Drive: As the belt drive mechanism uses a rubber belt, it is whisper quiet. Perfect for attached garages or when bedrooms are above the garage. Do you have kids or babies sleeping above the garage? If yes, belt drive might save you a few headaches (and tantrums).   2. Strength & Durability Chain Drive: Chain drive is basically built for strength. It can easily lift heavier or oversized garage doors, especially solid wood or double-car setups. Belt Drive: No doubt, it is still strong, but not ideal for very heavy doors. Best for standard residential doors. If your door is heavier than usual or you’re worried about long-term wear, a chain might be a better long-term bet.   3. Maintenance Requirements Chain Drive: It requires regular maintenance such as lubrication, tightening and noise control. Belt Drive: It can work with low maintenance. Belts don’t need oil and generally stay quiet for years.   4. Lifespan & Reliability Chain Drive: Chain drive is known for longevity can even last over 15 years with proper maintenance. Belt Drive: It is also long-lasting, but belts may eventually wear out faster than chains under extreme use.   Both are solid, but the chain drive wins slightly on long-term ruggedness.   5. Cost Chain Drive: Chain drive is more budget-friendly. Great if you’re looking for a solid system without a big investment. Belt Drive: It is pricier upfront, but worth it as you’re paying for quieter performance and convenience.   A real-world example: If you’re a homeowner flipping a house or managing rental properties, chain drives give you great performance at a lower cost.But if it’s your home, and you want something sleek, smooth, and quiet, belt drive is worth the extra cash. Garage Door Opener Belt or Chain: Which One Fits You? Feature Chain Drive Belt Drive Noise level Noisy Quiet Strength Very strong, lifts heavy doors Good for standard doors Maintenance Needs regular upkeep Low maintenance Durability Long-lasting with care Long-lasting with care Cost Affordable More expensive Best For Detached garages Heavy doors So, What Type of Garage Door Opener Is Best? It really depends on what matters to you most. If you want quiet and convenience, go with a belt drive. If you need strength and value, choose a chain drive. Still unsure? No worries! Ask yourself a few questions like: Is your garage attached to your home? Do you have a heavier-than-normal garage door? Are you okay with doing regular maintenance?   Your answers will take you in the right direction. Conclusion: Choosing between a belt vs chain garage door opener isn’t just about price, it’s about how you live. Before making a decision, consider your home layout, how much you use your garage, and what kind of noise you can tolerate. Both openers get the job done, both having their own pros and cons. Whatever you choose, make sure to hire a professional for the installation—safety first! If you’re nearby, we offer expert garage door repair in Plano, TX and reliable emergency garage door service when things go wrong unexpectedly. We’re just a call away whenever you need help! FAQs 1. Which is better: a belt or chain garage door opener? Belt drives are quieter and more low-maintenance, but chain drives are stronger and cheaper. 2. What type of garage door opener is best for heavy doors? Chain drive openers. They’re built for heavy-duty lifting. 3. Are belt drive garage door openers reliable? Yes! They’re durable, quiet, and perfect for most residential homes. CALL 214-624-6348 Book Online

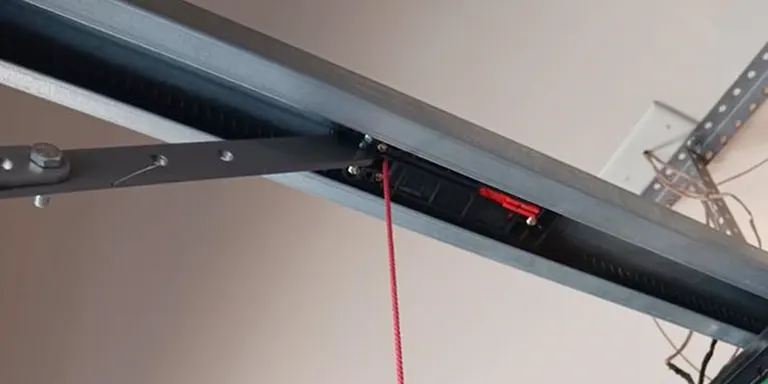
How to Disconnect Garage Door Openers for Manual Operation

Disconnect Garage Door

Ever found yourself stuck in the driveway because your garage door won’t budge, and there’s a power outage? Yeah, it’s frustrating. Yeah, it’s frustrating. But you can manually open your garage door by disengaging the opener. Many homeowners search for how to disconnect a garage door opener or even how to disengage garage door opener when the power goes out. But you can manually open your garage door by disengaging the opener. And no, you don’t need to be a handyman or own a toolbox full of fancy tools to do it. Let’s have a look at how to disconnect the garage door opener safely and easily, step by step. Why Would You Need to Disconnect A Garage Door Opener? Let’s first look at the reason why you need to disconnect a garage door opener. You might need to disconnect garage door opener for: Power outages Broken openers Routine maintenance Emergency situations So, sometimes, your only way in and out is manual. And knowing how to do this might just save your day. In short, knowing how to disable garage door opener or how to deactivate garage door opener can save your day. How to Disconnect a Garage Door Opener: A Step-by-Step Guide Here’s how you can do this like a professional or at least without breaking anything. Ensure your Safety First:Before touching anything: Make sure the door is completely closed. If it’s stuck halfway, support it properly to avoid sudden slamming. Manual disengagement when the door is open can be dangerous due to the spring tension. Locate the Emergency Release Cord: Look for the red cord hanging down from the opener rail. That is the emergency release and from this you can go manual. Homeowners often call this the garage door opener disengage cord. Pull the Cord Down And Back: Firmly pull the cord down and then back towards the garage door. This will disengage garage door opener and separate the trolley. Lift the Door Manually:Once the opener is disconnected, you can: Lift the door slowly with both hands Make sure it stays in place and doesn’t slam down. If you’re wondering how to undo manual garage door operation later, just reattach the cord and let the opener reconnect. If it’s too heavy or doesn’t stay open, that’s a red flag. You might be dealing with worn-out springs or other issues. In that case, don’t force it; call for emergency garage door service right away. How to Reconnect the Garage Door Opener? When the power’s back or the issue is fixed: Pull the emergency release cord straight down to re-engage. Then run the garage door opener like normal, and it should automatically catch the trolley. This process works whenever you disconnect garage door from opener and then want to restore automatic function. Or, manually close the door and run the opener. It’ll reconnect on its own. How To Take Off A Garage Door Completely: If you’re looking up how to take off a garage door, that’s a whole different game. If you’re searching how to disengage a garage door or even how to disconnect a garage door opener permanently, that’s a more advanced task. It involves: Detaching springs Removing panels Unbolting hardware Warning: This is not a DIY job unless you know exactly what you’re doing. Torsion springs can be dangerous. Call our company to handle it safely and efficiently. When to Call in the Pros: If your garage door: Feels heavy Doesn’t stay open Makes strange noises when opening manually Refuses to reconnect to the opener Reach out for professional garage door repair in Plano TX. Whether it’s a quick fix or full replacement, having a trained eye can save you time, money, and potential injury. And if it’s an urgent situation, don’t wait, our emergency garage door service team is ready to help 24/7. What If You Want to Fully Deactivate the Garage Door Opener? You might be wondering how to disconnect garage door opener or how to disengage a garage door opener for long-term safety. In these cases, unplugging or turning off the breaker works best. If you’re not just looking to disconnect the opener temporarily, but want to completely disable it. You might be wondering how to deactivate the garage door opener systems altogether. Here’s how you can do this: Unplug the opener from the power outlet. Turn off the circuit breaker connected to the garage opener, especially if you want to keep it off for a while. For smart garage systems, you may also want to disable remote access through the app or Wi-Fi settings. This is a good idea if you’re going on vacation, you’re doing long-term repairs and you want extra security. But remember, once it’s deactivated, your remote and keypad won’t work, so make sure you have a manual access plan ready. Conclusion: Power cuts and faulty openers are never fun, but now you know exactly how to disconnect your garage door opener and operate it manually. Still unsure or worried about safety? That’s okay. We’re here to help. Need fast, reliable? Contact our garage door repair team today. FAQs 1. How to disconnect garage door opener during a power outage? To disconnect a garage door opener during a power outage, first ensure the door is closed. Then, locate the red emergency release cord hanging from the opener rail. Pull it down and toward the door. This will disconnect the opener, allowing you to manually lift the garage door. 2. How to take off a garage door safely? If you’re wondering how to take off a garage door, start by releasing the tension in the springs, then remove the door panels one by one. It’s a dangerous task, especially with torsion springs involved. Unless you have experience, it’s best to call a professional for garage door removal. 3. How to deactivate garage door opener permanently? To deactivate a garage door opener, unplug it from the power outlet and switch off the circuit breaker it’s connected to. For smart systems, also disable

How to Fix a Stuck Garage Door: The 5 Quickest Solutions

fix garage door

Ever Walked Out to Leave and Boom, Your Garage Door Won’t Open? You hit the button on the remote. You wait. Nothing. The chain runs, maybe there’s a click… but the door stays right where it is. Sound familiar? You’re not alone. A stuck garage door is one of the most frustrating issues for homeowners. And while it feels like a mystery, most of the time the fix is surprisingly simple, once you know where to look. Let’s break it all down, fix those annoying problems, and save you from a service call (or help you know when you really need one). Why Is My Garage Door Stuck? You’re probably wondering: “Why now? It worked fine yesterday!” Garage doors are like cars. One day they’re smooth, and the next… they throw a fit. Here’s a breakdown of the most common reasons your garage door gets stuck: 1. Broken Springs or Cables (Classic Trouble) Garage doors are heavy. Springs do the heavy lifting. If one of them breaks, the opener might try to move the door, but it just can’t. You’ll hear the motor, but the door doesn’t budge (or moves unevenly). This is super common, especially in the summer heat or winter cold. Fix it: Don’t DIY this. Call a pro for overhead door spring repair. It’s a dangerous repair if you don’t know what you’re doing. 2. Garage Door Off Track Tracks can bend, get dirty, or go out of alignment. And if the rollers come out? Yep—your garage door gets stuck. You might notice the door jerking, tilting, or stopping halfway. Fix it: Sometimes you can gently guide rollers back in (if safe). But if the track is bent or broken, get help with garage door off tracks repair fast. 3. Sensor Problems Those little sensors at the bottom of the door? They’re more important than you think. If they’re dirty, misaligned, or blocked, your garage door thinks something’s in the way—and refuses to close. Fix it: Wipe off the lenses Make sure both lights are on (no blinking) Align them so they point directly at each other Still acting up? Time for a garage door opener repair. 4. Dead Remote or Wall Switch Not Working It could be as simple as dead batteries or your opener losing power. Fix it: Try the wall switch. If that works, your remote might need new batteries. If nothing works, check the power outlet and circuit breaker. 5. Manual Lock Engaged or Emergency Release Pulled Sometimes you or someone else might’ve pulled the red cord (emergency release). Or maybe the manual lock got engaged accidentally. Fix it: Make sure the manual lock on the inside isn’t turned Reattach the opener to the door by pulling the red cord toward the opener (until it clicks in) 6. Lack of Lubrication or Dirty Tracks Noisy, jerky, or stuck doors often just need a little TLC. Dust and grime can stop rollers in their tracks—literally. Fix it: Use lithium-based or silicone spray (not WD-40!) on the rollers and hinges Wipe down the tracks and clean up any buildup Want a pro to do it? Ask about residential garage door repair and get peace of mind. 7. Power Outage or Opener Burnout If your opener died during a storm, or the motor just gave out from old age, it might hum but not move. Fix it: If it’s dead-dead, schedule a garage door opener repair or replacement. Still Stuck? Here’s What You Can Do Right Now Try these steps first: Check sensors and remote batteries Make sure the opener is plugged in Look for broken springs or off-track rollers Pull the emergency release to open the door manually Lubricate the rollers and hinges Don’t do this: Don’t force the door open if it’s jammed Don’t try to fix broken springs or high-tension cables yourself Don’t ignore the problem—it can lead to bigger (and more expensive) issues When to Call a Garage Door Pro If you’ve tried the quick fixes and it’s still stuck, or if you hear grinding, snapping, or straining sounds, stop right there. Whether it’s a spring issue, off-track door, or opener failure, it’s best to get expert help with: Garage door opener repair Overhead door spring repair plano Residential garage door repair plano Commercial door off tracks repair plan A professional can diagnose the problem in minutes and get your door working like new. Final Thoughts Getting stuck in or out of your garage is more than annoying—it can throw off your whole day. But now that you know the common culprits, you’re not left guessing. And with the right fixes, your door should be good to go in no time. Quick tip: Schedule regular maintenance once or twice a year. It can prevent 90% of the issues above. FAQs 1. Why is my garage door not opening? There could be several reasons your garage door isn’t opening. It might be due to dead remote batteries, misaligned sensors, a jammed track, or a power outage affecting the opener. Sometimes, it’s something as simple as the lock being engaged or the manual release cord being pulled accidentally. 2. What should I do if my garage door won’t open? First, don’t panic. Start by checking the remote batteries and the opener’s power source. Then, inspect the safety sensors and garage door tracks. If everything looks fine and your garage door still won’t open, try manually lifting it using the emergency release cord. 3. How do I fix a stuck garage door? To fix a stuck garage door, check for visible obstructions in the tracks or around the rollers. Also, make sure the springs and cables aren’t broken. If it’s jammed halfway, avoid forcing it open — this could make things worse. If in doubt, call a professional to avoid further damage. 4. Why is my garage door jammed on one side? If your garage door is jammed or crooked on one side, it’s often due to a broken spring or the door coming